Tuesday, July 31, 2012

Sunday grilling: Homemade burgers with lavender and mint, among others

This week’s grilling experimentation: Homemade burgers. Surprisingly, we had never done this before - it’s actually just about as easy as people claim! Us being us though, we thought we’d spice things up (hahaha!) by making three different varieties: smoked paprika/cumin/coriander/hot chili, dried lavender/mint, and celery seed/fennel (lavender, mint, coriander, celery seed all homegrown by Herbmaster Christian :)

We used ground chuck, but I’ve heard ground sirloin is supposed to be even better. I think you don’t want something too lean here - the extra fat really helps with keeping the burgers juicy. We started with three pounds (a pound for each variety) - which ended up being dinner for both of us, plus about two extra dinners (we ended up just freezing the additional uncooked patties).

I think the key here is lots of chopped onion and garlic! (Really, when has anyone ever gone wrong with lots of onion and garlic?)
Portrait of a red onion from our CSA... isn't it gorgeous?! I'm getting into this food blog photography thing.

I cooked them a little bit first (on low heat) until they softened up a bit - for fear that they might stay raw in the finished burgers otherwise. But perhaps someone can tell me whether this is really necessary or not.

More gratuitous onion shots.
In the meantime, Christian ground the spices in the spice grinder (repurposed coffee grinder). Like pretty much everything else that we do, the exact amounts/combinations/etc are really up to you! Like the onion and garlic, I’m in favor of “the more the better”.


At this stage I combined all the ground beef, tossed in the softened onion and garlic, and tossed gently to combine. You really don’t want to overwork the meat, so be gentle. Then I re-separated this into three batches, and seasoned each one. Lots of people say to refrigerate the meat at this stage for about an hour, so this is what we did (though we might not have made it to an hour).

In the meantime, we marinated some onion slices in red wine to grill along with the burgers (love grilled onions!) I got this idea from Clean Eating magazine. Luckily we had some cheap red wine leftover from Christian's blackberry cabernet sorbet that he made (details in a future post).
After it's been refrigerated for a while, take the meat mixture and form it into patties. The internets say that you should really just gently pat the patties together without overworking them, but we found that if we were too gentle, the patties started to fall apart... so there’s a fine line. We made ours of sort of medium thickness - I didn’t want them too thin in case they dried out. Pat down the middle a little bit with a finger or two to prevent them puffing up on the grill.
 And grill! We found 5 minutes per side was just about perfect.
 We were actually shocked by how delicious these turned out - both of us thought these would fail miserably, but they were actually fantastic - super moist and flavorful.
We had so much meat mixture, and they were so good fresh, that we decided to freeze the remainder of the uncooked patties. Philosophical side note: I’ve been thinking a lot about this notion of your “present self" having different priorities than your "future self" - sort of like this video, but in a more general sense than just procrastination. Several years ago I really chose my actions more for my "present self" (leaving my clothes on the floor to save time in the morning, leaving dishes in the sink after dinner, etc) than for my "future self". By the next day of course, my now-"present self" was rather annoyed at my now-"past self" ("damn roommates, who left the dishes in the sink... wait, I don't have roommates anymore...") After years of this, and routinely finding myself cursing out my "past self" (and living with Christian, who made me clean up my act :) I put a lot more effort now into keeping my "future self" happy, even to the seeming-detriment of my present self. (When I was sick, I had a lot of time to think about a lot of things related to life optimization, some of which may find their way into this blog from time to time. Hey, it's (half) my blog (and I like nested parentheses...)). Anyway, my "future self" will be very pleased at the homemade burgers in the freezer - the only thing better than eating a nice meal once, is... eating it twice.

Anyway, if you haven't made homemade burgers, you should - they are easy and WAY better than store-bought. I now leave you (well, the one of you who is actually reading this... Hi Dad!) with Scenes from Sunday, which convey it best. :)

Christian shows off his "bird pepper" plant, along with the awesome apron I bought him. :)
Close-up of the bird pepper plant.
Ahhh... Sundays!
Christian's hollyhock plant is really tall. Indian shown for scale. (Oh, come on, I'm not that short. Well... maybe. But that's irrelevant here - the plant is really tall!) You can see the rest of our backyard and Christian's garden.
Some things are always just out of reach.
Christian's garden is so prolific, it's overflowed into these repurposed recycling bins.
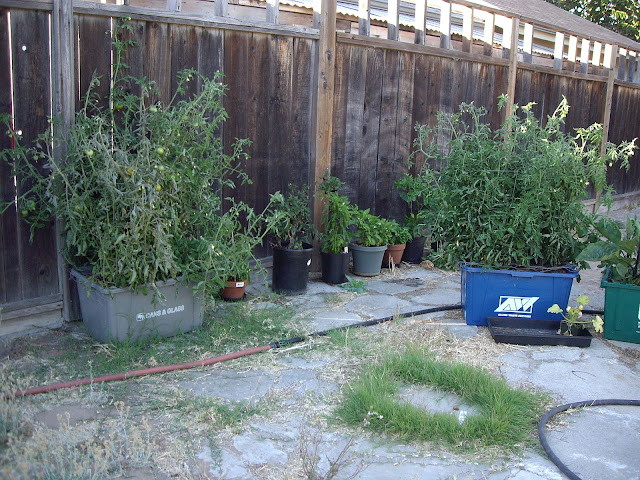
Christian's tomatoes are actually doing pretty well in the recycling bins.
Sun setting on another successful barbecue. :)

Sunday, July 29, 2012

Chocolate fondue on the BBQ grill - with grilled cherries and salted dulce de leche

In the summer, a young couple's fancy lightly turns to thoughts of grilling. Then what's for dessert?

What I love most about cooking is coming up with some off-the-wall idea - "I wonder if we could..." - and then seeing if it actually works. This dovetails nicely with a game I play with myself, called Iron Chef: Fridge/Pantry Edition - where, you guessed it, you have to come up with a creative way to use up all those random fridge/pantry scraps. And so I present the latest iteration: dulce de leche chocolate fondue on the BBQ with grilled cherries for dipping.

Me being me, one day last summer, I said to Christian, "I wonder if we could grill cherries?"

Why not? Thus in two separate bursts of inspiration, this decadent dessert was born.

Start with washed whole cherries (leave the stems on - they make great handles for fondue dipping!)
Toss with butter and sprinkle with cinnamon.
Here's the key: DON'T use charcoal briquettes here - because the cherries cook for so long, you really need to be cooking over hardwood or hardwood briquettes here for this to work. Otherwise your cherries will end up covered in black charcoal dust and will taste like charcoal. Not what you want. We use mesquite (combo of hardwood and hardwood briquettes).

Dump cherries into a metal roasting pan (we use the disposable aluminum ones, but reuse them until they get too nasty - very convenient for grilling). Place on grill over indirect heat - or start on direct heat and move to indirect heat. You don't want these to get too hot.
Leave on until they're of the desired doneness. I like them when they soften and get a little jammy, while still retaining their shape - this could take ~40 minutes with indirect heat. I like to start them just before you start eating dinner - this way they're done by the time people are ready for dessert.

So one time when we were grilling, I started walking around our kitchen and eying the shelves... Spying half a bag of chocolate chips, some baking chocolate squares, and a random can of dulce de leche, the dulce de leche chocolate fondue on the BBQ was born! (Iron Chef for the win!)

Add chocolate chips and baking chocolate (you could probably use one or the other, this is just what we had) into a small high-sided aluminum baking tray. Add copious amounts of dulce de leche, or to taste.
Add a splash of milk too to help this eventually become fondue consistency. You want this to be liquidy enough that fruits will actually dip into it, instead of just floating on the surface. You can adjust this as the chocolate melts. Place on the grill - be very careful here. You probably want it on indirect heat, or you could briefly start on direct heat and then move it to indirect heat. But stir constantly or at least frequently to prevent burning/sticking etc.
Adjust fondue consistency with a little milk if needed. When finished, sprinkle the fondue with a little coarse sea salt if desired - this really sends the chocolate and dulce de leche combination over the top! That combo was inspired by the Melting Pot fondue we tried last year.

If you get tired of waiting for the cherries and want to dig into the fondue, you can always start with strawberries or other dipping treats (fruits/brownies/pound cake/rice krispie treats) for the fondue! These strawberries are freshly picked from our garden. Mine fell off - which is when we decided to add a little more milk to improve dipping.
Christian's hand, not mine (what gave it away?)
When the cherries are done, just hold them by their stems... and dip! Be careful not to bite into the pits. This is the perfect dessert to share with friends at the end of a BBQ. A few Sundays ago when we tried this, our neighbors all came home around the same time - we broke out some white port we had been saving, and all hung out around the BBQ, dipping cherries in the fondue and drinking port - a great end to a Sunday of grilling. :)

PS - Christian points out that grilled mesquite cherries are also great dropped in a bottle of bourbon. But I'll let him do his own post on his alcohol infusions. :)

Enjoy!

Veena

Saturday, July 28, 2012

Southern Belle Peach Cobbler

I swear I must have been a Southerner in a previous life. (I'm South Indian, but that doesn't count.) I go nuts over barbecue, make a mean slow-cooked pulled pork, eat collard greens by the bowlful, and am perpetually on the lookout for hushpuppies. In college I had a quest to find the perfect cornbread. So it shouldn't be a surprise that I spent many weekends last summer optimizing my peach cobbler recipe. I'm admittedly a little reluctant to share my secret peach cobbler recipe, but here it is. (Don't say I never did nuthin' for ya.)

Start with great summer peaches. (We're big fans of Kashiwase Farms.)

You can't tell here, but these peaches are huge!
I've adapted the basic recipe from this one: The first group of ingredients is the cobbler itself, and the second group of ingredients is the topping. The topping is delicious and we feel like there's never enough topping, so I double the topping. I also eliminate the white sugar from the recipe altogether. (I don't feel like great peaches need tons of sugar anyway)

Cut the peaches into chunks/slices. (Or get your husband to do it. That's what I do.)

Sprinkle the peaches with the first batch of ingredients and toss to mix. You can modify the sugar/spices according to your preferences.
Prebake at 425 deg for 10 minutes.
While that's baking, make the topping from the second batch of ingredients, following the directions.
Remember, if you don't double the topping, you will probably wish that you had.
Except that I add an earth-shattering secret ingredient that really sends this recipe over the top. Cardamom! Add freshly ground cardamom to taste - I add ~4 pods worth of seeds.
Every card-carrying chemist needs a good mortar and pestle.
Drop spoonfuls on top of the prebaked peaches, and put in the oven ~30 minutes.
Personally I skip the sugar/cinnamon topping they suggest, and just sprinkle a little cinnamon on top. This also makes it look a little extra brown when it's finished baking. Take out when it's cooked to your preferred done-ness - golden-brown up top.
And enjoy!
It took all my willpower to shoot this photo before digging in.
I have to admit I don't really enjoy baking, but I'll make an exception for peach cobbler. This makes a great dessert for summer gatherings/potlucks/etc (this was originally intended for friends).

If you had told me four years ago that I'd be spending Saturday nights baking with my hubby,  happily married, and living in the suburbs, I likely would have laughed in your face. But I'm extremely happy. Domesticity is slowly growing on me. :)

Veena

Sunday, July 22, 2012

Scenes from Sunday BBQ

One of my favorite things to do in the summer is hang out with friends in the sun over tasty BBQ and a beer. Really, I don't think it gets much better than that! Last summer, inspired by friends, we realized that we didn't have to wait for other people's schedules - we could just grill in our backyard every weekend. We normally cook big batches of stuff on Sundays anyway to prepare for the week, in the summer we just shift it outside to the grill. Christian's my best friend and I really love hanging out with him - which is why we're married, duh - so what better way to spend your Sundays than experimenting with grilling stuff and drinking beer with your best friend while listening to classic rock?

We typically do our Sunday grilling initially without a specific plan, but based on what our neighborhood market has on special that week and what's in our CSA box, and then develop a plan around what's on sale. I have to admit that usually we hit the market on Saturday and marinate the meat overnight - but this week we were feeling too lazy to go to the market on Saturday, so instead we went on Sunday - and decided to go with rubs instead of marinades for the pork ribs and steaks they had on sale. (Hey, at least this is a realistic food blog... and we're real people who don't always feel like cooking!) Am I the only one who likes buying interesting rubs/sauces/etc... but then hoards them without using them because I'm saving them for some magical special occasion? I'm trying to break from this habit because I realize it's silly, especially after reading this - it's worth a read - http://www.happyhealthylonglife.com/happy_healthy_long_life/2010/05/to-life.html . And given the fact that I was so ill for so long - guess what, there is a special occasion, it's called "life"! So we decided to try out a bunch of rubs we've been hoarding. We also grilled up some peppers and some gorgeous CSA eggplant. Dessert was a grilling tour de force that deserves its own post (coming soon!)

Our awesome neighbors happened to come home in the midst of our grilling (we share a backyard), so we ended up hanging out with them for a while (hence a lack of pictures of the finished food - I'd rather live real life as it happens, instead of breaking the flow of life for the sake of the internet...) But otherwise the pictures are fun, so without further ado, we present: Scenes from a BBQ.

Pork ribs rubbed with a smoked chipotle & black tea spice rub from a little store in Palo Alto
Pork steak with an herb mix Christian brought back from a conference in Greece (I'm as jealous as you are)
Another one of Christian's Greek herb mixes - this one has more red pepper
I think too rarely do we truly appreciate how gorgeous fresh produce can be
I've learned a lot about the joys of "hanging out" from this stray cat who shows up every day around 7 because he knows that at least one of us is often outside around that time. He doesn't even beg for food, he honestly just likes... hanging out with us.
We know he's happy to see us because he does this slow-blinking/squinting thing at us that apparently means that he likes and trusts us, in cat-speak. And NO, I do not touch him - that's gotten me into enough trouble already!
Christian's been talking for a while about how he needs a "manly apron" - so this was my gift to him.


This is the closest I get to camping, honestly

Dessert post to follow shortly! (Think: grilled fruit chocolate fondue, with some twists - like dulce de leche...)

Saturday, July 21, 2012

What to do with shishito peppers

Shishito peppers have got to be one of my favorite foods. I love how it's like playing pepper Russian roulette - one in every ten peppers is spicy, according to Wikipedia, but in my experience it's often closer to three or four out of ten! Seems to vary on the batch though. They're related to the Spanish padron pepper. We usually get them at our local Japanese market, so you can imagine my excitement when they were in our CSA box this week. I called them up and requested two extra pints.
Ready for business!
My favorite way to make these is to grill them - usually in a pan, but we've threaded them on skewers and made them on the grill as well. First up - wash them thoroughly, and most importantly, pat dry! Otherwise you will regret it when it's grilling in the pan, and the hot oil is sputtering in your face. (Hypothetically)
Drizzle with a little oil. I did this in a separate bowl to minimize oil in the pan, but Christian reminded me that I could have used our new olive oil pump spray thing - will do that next time.
Ready to go!

Toss in the pan. Make sure you turn up the heat to HIGH - or at least close - you really want to make sure these peppers grill and not sautee.
t=0
Personally I like my peppers on the dark brownish, blistered, exploded and deflated style, but you can adjust to personal preference. Keep a close eye on these, but at the same time, you don't want to stir *too* often - you want them to blister and char in spots. Stir occasionally though so they cook on all sides.
Starting to blister
Like I said, I like mine really on the done side - these aren't burned, I swear, they are delicious!
How I like them
This should take 5-10 minutes, depending on the batch. Remove from heat, sprinkle with sea salt, and you're good to go!
Delicious!
Someone decided to start in on the bowl before it even hit the table.
He was totally caught green-handed, looking guilty.
These were delicious! I was a little disappointed though that the CSA ones were so mild - not a spicy one in the bunch. I really like the batches where it seems like 5 out of every 10 is a mouth-scorcher - and you're cursing and crying and drinking wine to kill the pain which only makes it worse... and shoveling more peppers into your mouth... until you're a sniveling mess... and it hurts like a mother... but when they are done, you talk about how fun it was.

Maybe it's just me. Christian said he didn't miss the spicy ones...

Veena